How to Install Drivers Manually in Windows
Sometimes, Windows does not install the right driver for a device. When that happens, you need to try a manual driver install. This means you will install the driver by yourself without using automatic tools. In this article, you will learn how to do a manual driver install and also how to do a proper Windows driver fix if things do not work.
What Is a Driver?
A driver is a small piece of software. It helps your computer talk to hardware like a printer, keyboard, or graphics card. If your driver is missing or broken, your device may not work well or may stop working. That is why you sometimes need a Windows driver fix or a manual driver install.
When Do You Need a Manual Driver Install?
You may need a manual driver install when:
- Windows cannot find the right driver.
- A new device is not working right.
- The old driver has errors or bugs.
- You downloaded a new driver from the device maker’s website.
Doing a manual driver install can help fix these problems and is a good way to do a clean Windows driver fix.
Steps for Manual Driver Install in Windows
Follow these simple steps to complete a manual driver install:
Step 1: Download the Right Driver
- Go to the device maker’s website. Look for the driver that matches your device and your Windows version.
- Save the file on your desktop or in a folder you can find easily.
- Make sure it is the right driver. If not, the manual driver install might fail or cause problems.
This is a key step in any Windows driver fix.
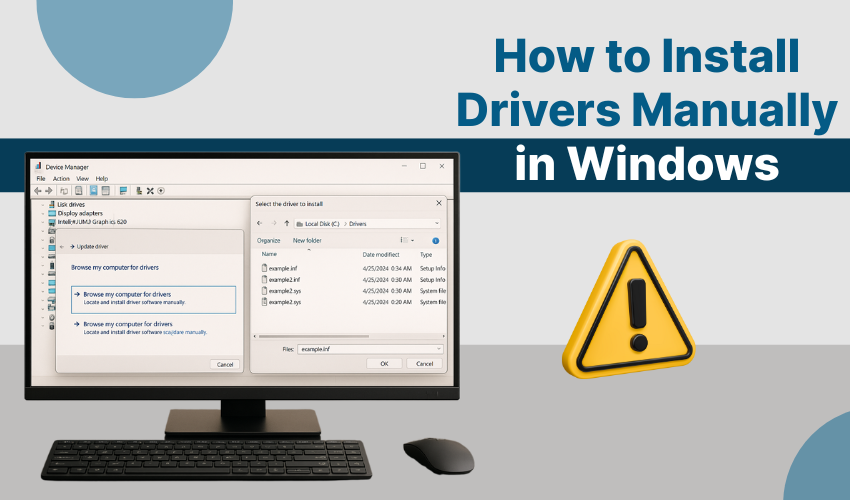
Step 2: Open Device Manager
- Press Windows + X and choose Device Manager from the list.
- All the devices connected to your system will show on screen.
- Look for the device that needs a driver.
- It may have a yellow sign or may be listed under “Other Devices.”
Step 3: Update the Driver
- Right-click the device name and then select Update driver option.
- Now choose “Browse my computer for drivers.” This is the part where the manual driver install starts.
- Click “Browse” and go to the folder where you have saved the driver file.
- Select the folder and click Next.
- Windows will search and install the driver from that folder.
Step 4: Finish the Install
- Wait for Windows to finish the install.
- It may take a few seconds.
- Once it is done, you will get a message saying the driver was installed.
- You just completed a manual driver install successfully.
- This is also one way to do a basic Windows driver fix without extra tools.
What If the Driver Does Not Work?
If the new driver doesn’t work, do not worry. You can try another version of the driver. Go back to the maker’s website and download a different one. Then repeat the manual driver install steps.
Sometimes, doing a Windows driver fix means trying two or three drivers before finding the right one. That is normal.
Use Windows Troubleshooter
If you still have problems, use the Windows Troubleshooter.
- Open Settings.
- Go to Update & Security.
- Click Troubleshoot.
- Select the device and click Run the troubleshooter.
This can help you find errors and guide you in the Windows driver fix process.
Tips for Easy Manual Driver Install
- Always download drivers from the official website.
- Check the version and Windows compatibility.
- Restart your computer after the install.
- Create a restore point before a big manual driver install.
These steps keep your system safe while doing a Windows driver fix.
Conclusion
A manual driver install is not hard if you follow the right steps. It helps fix driver issues and gets your device working again. Whether you are fixing a mouse, printer, or sound problem, learning how to do a good Windows driver fix can save time and stress.
Use this guide whenever you face driver trouble. A simple manual driver install can often solve the issue quickly and without help from others.