How to Set Static IP for Your PC
Assigning a static IP to a PC can help maintain a stable connection and avoid conflicts on your network. Unlike dynamic IPs that change automatically, a manual IP remains constant, which is useful for gaming, remote access, or network devices. This guide will show you how to configure a static IP setup on your Windows PC through simple numerical steps.
Understanding Static IP Setup
A static IP setup is an excellent method of manually assigning an IP address to your system rather than relying on automatic assignment from a router. The setup allows consistent access to your device on the local network.
Before you get started with the process, you should know your network settings, including the IP range, subnet mask, default gateway, and DNS servers. These details are essential for a successful manual IP configuration.
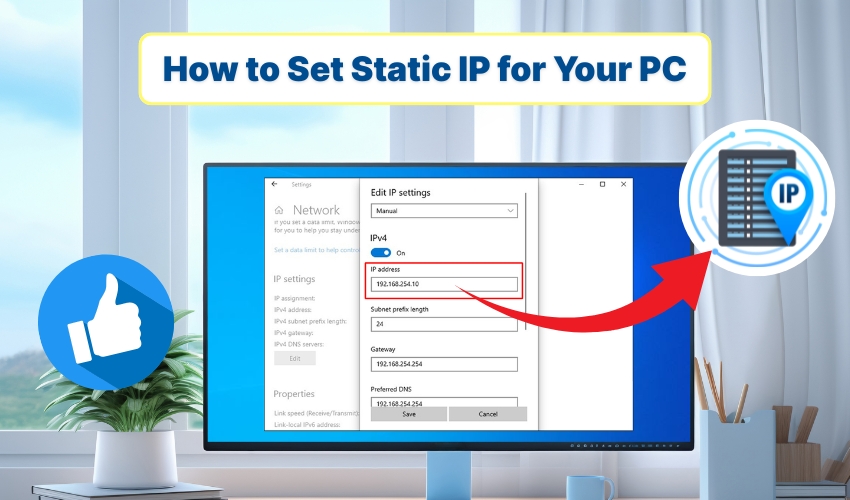
Steps to Configure Static IP on Windows
- Click on Start menu, then go to Settings > Network & Internet. Select the Ethernet if using a wired connection or Wi-Fi for wireless. These network settings provide the option to view and change your current IP.
- Scroll down and click Change adapter options. A new window showing all available network connections will open. Right-click on connection you want to set a static IP for and select Properties.
- In the properties window, double-click on Internet Protocol Version 4 (TCP/IPv4). This is where you can switch from automatic IP to manual IP.
- Select Use the following IP address. Enter the IP address you want your PC to use. For example, 192.168.1.50. Fill in the Subnet mask (usually 255.255.255.0) and the Default gateway (your router’s IP, e.g., 192.168.1.1). This step is the core of a static IP setup.
- Under the same window, select Use the following DNS server addresses. Enter the preferred DNS (like 8.8.8.8) and the alternate DNS (like 8.8.4.4). Correct DNS settings ensure reliable internet access after your manual IP is applied.
- Click OK in order to save the settings, then Close the properties window.
- To confirm, open Command Prompt and type ipconfig. You should see your manual IP listed. Your static IP setup is complete, providing a stable network address.
Tips for Static IP Setup
- Avoid Conflicts: Make sure the IP you choose does not overlap with other devices on your network. Check your router’s DHCP range.
- Document Network Settings: Keep a record of subnet mask, default gateway, and DNS to revert changes if needed.
- Restart if Necessary: Sometimes, a network restart is required for the manual IP to fully take effect.
Advantages of Manual IP
A manual IP offers several benefits and prevents your PC from changing addresses, which is most likely to disrupt file sharing or server connections. It is also essential when hosting services or accessing your computer remotely. Static IP setup is preferred for devices that need consistent network recognition.
Conclusion
Doing this keeps your device connected without interruptions. A manual IP works well for gaming, remote desktop, or home networking. Check your IP using Command Prompt or the network settings to make sure it is correct. A proper static IP setup keeps your network organized and prevents conflicts.